
How to use Canva to enhance your Notion Workspace
Canva is a freemium image editing software that you can access through your web browser. Having used Adobe Suite and a number of other tools, I can confidently say that it’s one of the most user-friendly editing software out there in the market - perfect for beginners with little to no design knowledge.
I use Canva on the regular for almost everything design-related. This includes creating custom images for curated Notion templates.
If you’re here reading this guide now, I’m certain you’ve seen some examples of how the aforementioned custom banners can instantly breathe life into a once dull Notion workspace.

Set your Notion workspace apart from the rest with some custom images.
The best part is it can honestly take less than 10 minutes once you’re familiar with this process.
Here’s a step-by-step guide on how you can do it too!
1. Create a Canva Account
As mentioned in the beginning, Canva is a freemium editing software. While it’s not necessary for you to sign up for the premium plan to design and create these custom images (the free plan is more than sufficient), you do still have to create an account regardless.
Just follow along the onboarding process which could be as simple as logging in with your gmail account and you’ll be ready in literally seconds!
2. Setting Custom Dimensions
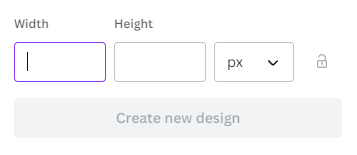
Now that you’ve created your account, you should land on a page that looks something like this. It’s your Canva dashboard where you can sort and view all your projects and designs.

Navigate to the top right of the “What will you design today?” banner and click on the “Custom size” button. A dropdown window will appear with two empty fields we need to fill: one for the width, and one for the height. The metric used to measure these dimensions on Canva is pixels by default.
Okay, let’s stop for a bit. In case you feel like I’m moving like a freight train and wondering why there’s a need to go as far as to set custom dimensions, it’s because of the way images behave in Notion. Images, when uploaded to Notion, fill up the entire width given to it. As their aspect ratios remain the same, its height will also scale up proportionately. This inadvertently leads to an image’s dimensions playing a huge role in how it ends up looking and the amount of space it occupies. Reference screenshot below on how big the difference is.

On the left is a 1x1 image (1080x1080px) compared to a 1.5x1 image (1500x1000px). Both columns are of the same exact width.
To bypass this limitation, we need to create images with tailored dimensions based on how much space we want it to take up.
I usually eyeball this by estimating the aspect ratio required for the design. However, if you want to eliminate any chances of error, there’s a free online ruler that can assist you with this. Take a screenshot of your Notion space and use the measurement tool to get the exact dimensions of the area you want your image to cover. Input those dimensions into Canva after!
3. Online Resources
Having created the blank canvas, we can proceed to the next step: deciding on what to fill it up with!
The beauty about Canva is that you have thousands of elements to choose from. Their expansive library offers you a seemingly endless selection of photos, stickers, customizable shapes and even audio tracks. Unfortunately, some of these are locked behind the premium plan, but the resources available for users on the free plan are abundant and highly generous in my opinion.
However, we won’t be relying on Canva for the design’s background. No, we’re not going to limit ourselves at this initial stage. Why would we when we have the entire internet at our disposal?
Hop onto Google (or your preferred search engine, no hate if you’re a Bing fan!) and go crazy. Maybe you want an anime-inspired theme. Or you could have just visited Korea and still haven’t gotten over the Seoul streets. Nature, outer space, food… nothing is off the table since you’re plucking these images off the web.
Copy the image that caught your eye. And just paste it into your Canva design.

Yes, it’s that simple!
If the image isn’t filling up the entire canvas, right click on it > Set image as background.
If you’re not happy with how the image is positioned on the canvas, double click on the image. The image’s entire border will appear, showing you what’s inside and outside of the canvas. You can then move the image as you please.
4. Adding Elements
We can work on adding some elements to the canvas now! Remember how I said that Canva has many resources for us to use? It’s time to bring them out!
Everybody will be able to access the Text element. It’s the most essential element to creating our desired banners on Notion. On the leftmost navigation bar, select the text icon and it will open up into a window where you can choose from several text styles to insert into your design.

Your options are naturally more limited if you’re on the free plan, but you still have over a hundred popular fonts to choose from along with a plethora of customization options and pre-built text blocks combining different fonts you can use as inspiration.
In addition, there’s also the Elements tab where all of Canva’s assets reside. Once again, a good chunk of them are locked behind a paywall, but there are still a number of free graphics, shapes and stickers available. Play around with them - you never know what you might find!
Here’s a simple banner I designed.

P.S. You can tell if an asset is free for use or not through the presence of a golden crown icon at the bottom right. Those without are entirely free to use. As a long-time premium Canva user, I’m genuinely surprised at how generous they are!
Another P.S. If you ever accidentally delete the image on Canva, instead of going back to your browser and going through the entire copy-paste process again, you can go to the Upload tab. Canva automatically stores all uploaded images here.
5. Export Your Design
After you’ve finalized your design, it’s time to export it.
Canva makes this exporting process a breeze. Navigate to the top corner where there’s a white “Share” button. Click on it -> Download -> File Type -> PNG.

You don’t get to select any other options if you’re on the free plan, but if you do ever decide on going premium, you can use Canva’s transparent background feature to export images that blend seamlessly into any Notion workspace. Of course, if you intend to do that, make sure your text isn’t of the same color as Notion’s background or it’ll end up blending in so perfectly you don’t see anything.
But I digress. If you haven’t already allowed access to Canva to make downloads on your browser, a notification window will pop up asking for permission. Upon download completion, you’ll find the image in your downloads folder.
6. Upload to Notion
From there, tab back to your Notion and upload the image. You can do this by typing “/image” on the block where you wish to insert the image.
As the image was customised from the very beginning with proper dimensions, it should fit perfectly where you want it to. If it doesn’t, start afresh and make the necessary amendments.
7. Additional Tips
You might sometimes encounter a situation where the image you found online ends up being a bad background. Its colours are too similar to that of the text you want to layer above it. However, you really, really think that this specific image is the best option and you don’t want to have to find an alternative.

Here’s a solution: use a shape element and layer it between your text and background. Change the shape’s fill colour to black and adjust its transparency to around 10~20%. You are essentially darkening the background so your white text stands out more by way of contrast. It’s exactly the same but in reverse if you want black text.

Alternatively, you can also consider adding a filter to your background images. Click on your background image > Edit Photo on the top navigation bar > Filters > Select desired filter.
Supporting your notion to Notion.
Hey, it’s Ken from Caffiend. Thanks for visiting my shop and reading my content! I hope I was able to help you out in one way or another.
If you’re new to Notion and would like to learn more about it, I recommend checking out my Beginner's Guide to Notion.
Or if you’re just looking for some templates to kick-start your Notion journey, consider my free Notion Starter Pack or Notion Life Suite featuring an array of curated templates meant to keep every aspect of your life organized.
Also, if you have any questions or just want to talk Notion, feel free to drop me an email at ken@itscaffiend.com. I promise I don't bite!
Until next time, stay safe and as always, stay productive!